Getting a new Vostok is always exciting, especially if you have been waiting weeks for it to arrive.
However, when you realise that the instructions are all in Russian and there isn’t any pictures showing how to adjust the bracelet it can be a bit daunting to trying to work out how to do it.
Luckily it isn’t that tricky and I will go through the process below. Vostok bracelets get a bad name, but if you adjust them and get the perfect fit they can be very comfortable and enjoyable.
(You can read more information about – Are Vostok Straps Bad?)
Try It On
First you need to try it on and estimate how many links you need to remove and of course see what the watch looks like on your wrist.
You will probably need to remove a couple of links, as the bracelets seem to always be massive. If you have put your Vostok on and it fit straight away, I want to know! You must have some seriously big wrists!
Anyway, it’s also important to remember that your wrist will swell it is best to do this when you are warm, as you wrist will be at its largest.
Tools You Will Need To Adjust A Vostok Watch Bracelet
- Spring Bar Tool
- Watch Bracelet Holder
- Something to push the pin out – pin remover tool, or something like a screw driver
- Something to push the pin back in – A Watch hammer.
I will give alternatives that you can use when I’m describing what you need to do.
(You can also read about the tools I used in – A Review Of The “16 Piece Watch Repair Tool Set”)
How To Remove The Links On A Vostok Bracelet
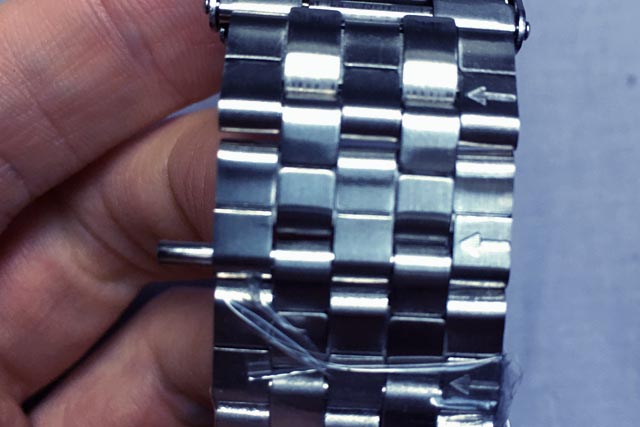
If you look at the side of the bracelet you will see the links are not solid and you can see they are made from folded metal. You should notice a circle shape. This is the pin that is holding the link on to the one next to it. This is what we need to remove.
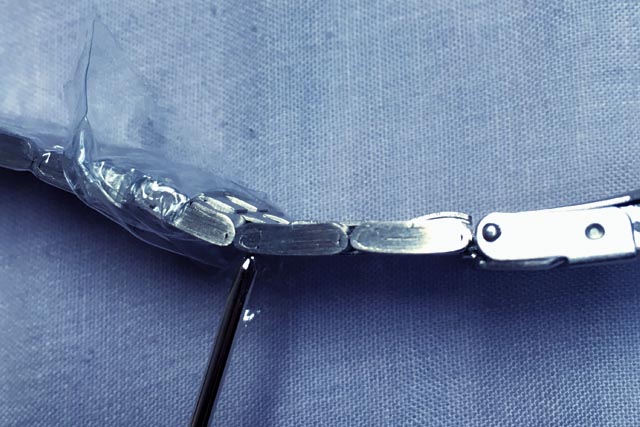
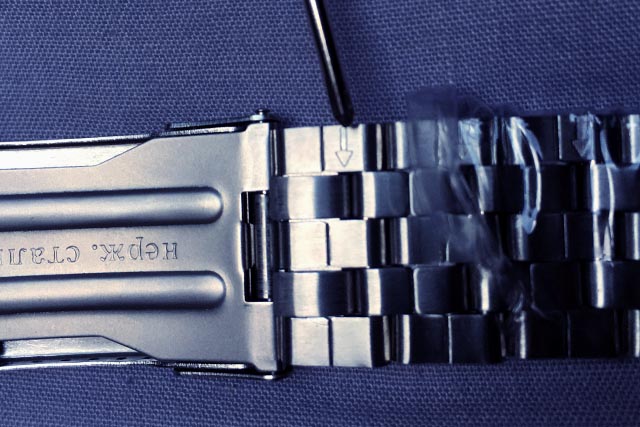
If you flip the bracelet around and look at the back, you will see a little arrow on one side. That is the direction you need to push the pins, then they will come out the from other side.
Removing Them
I would recommend that you remove the bracelet from the watch using the spring bar tool. Then you can set the watch head safely to one side as you deal with the bracelet.
Some people may just use the spring bar tool to release the buckle and open it up like it was a normal strap and some people will just keep it all together and start removing the pins. I would try and be more careful and remove the bracelet fully so your watch is out of the way.
Use A Pin Remover Tool
If you are using a pin remover tool, line the tool up with the pins so that the tool will push the pin in the direction that the arrow will point. Turn your tool and the pin should start to come out.
If you have a pathetic pin remover like me, it will probably only go half way. Vostok bracelets are pretty thick at 22mm across, so not all tools can push the pin all the way through.
I tried to pull it out the rest of the way using pliers, but this did not work, so don’t waste your time with this. You can’t get the right amount of grip to get it out, unless you are freakishly strong.
You are better to find something long enough that you can poke the rest of the pin out. I used a small screw driver that could reach all the way through the length of the pin.
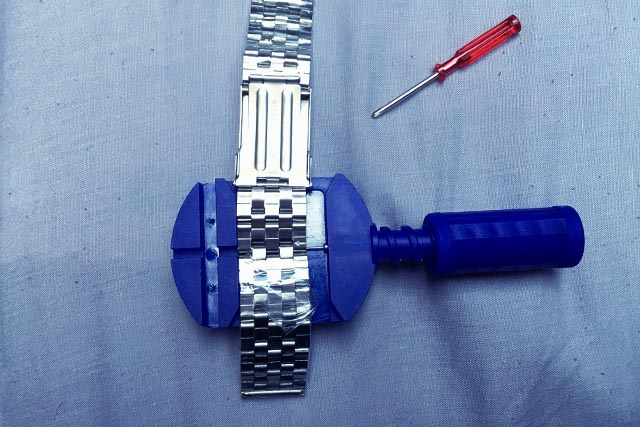
Use A Bracelet Block
If your pin is only half way out, or you do not have a pin remover tool, then you can use a bracelet block to finish the job.
The block just holds the bracelet still so you can work on it. You could do this in your hand, but it would be very difficult. The pins can be stiff, so having something to hold the bracelet for you is very helpful.
You could try and use something else to hold the bracelet, like some sort of vice. Basically anything that will keep it still so you can apply pressure to the pins and remove them is going to work.
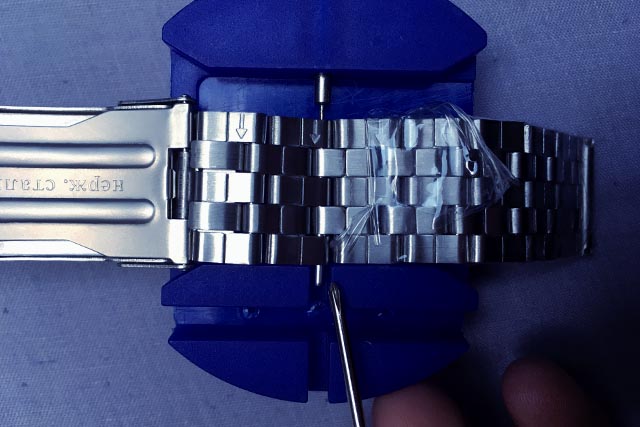
Once you have the bracelet in the block, you just need to use something to push the pins out. I used a small screw driver.
This is not ideal as the tip is quite small and could have caused scratches, but it worked. If you can find something that is flat and just a bit smaller than the pin you will be able to push down a lot easier.
I did try using the flat end of my spring bar tool, but the problem is I could not push down on it from above, due to the forked end. You will never generate enough force trying to hold it from the side and pushing. The screw driver worker well as it had a flat top that I could place my palm on and push down with a lot of pressure.
You just need to push the pins in the direction that the arrow points and they will come out.
It Can Be Hard
As I said, it can be hard to push them out. They will be stiff and you will need to use a lot of force, especially if you are using less than idea tools.
Once you get one out you will get a feel for how much pressure you need to apply and you should find the next ones easy enough to remove.
Repeat This
Now you have one pin out your bracelet will have come apart. So you need to repeat the process on the pin next to it so you get the whole link out.
You don’t need to remove one link at a time. You can remove a few at once if you think you need to.
If you need to remove two links from the bracelet, you should remove one from each side of the clasp. I know it’s annoying, as you have to remove a lot of pins from both sides, but it will make the bracelet more balanced when you are finished.
This is easy if you are removing an equal number of links. If you are removing an odd number, you may need to play around with what side you should take more form.
Try and Size The Bracelet
Before putting everything back together you should try and check you’ve removed the right amount. This isn’t vital, as you can always come back and adjust it, but I find it makes the chances of this a bit less.
I try to drape the watch and strap around my wrist to see if it fits. This is extremely fiddly as the links are not attached.
I have used wooden toothpicks to help me, by feeding them through the holes of the links, as if they where the pins. This sort of holds the bracelet together long enough that I can tell if it fits. Just be careful as everything can fall apart very quickly, so just do this on your desk, don’t try and walk around or your watch will fall.
Hopefully this will give you a rough idea if you have removed enough links or not
Reassemble The Bracelet
Now you just have put the links together and push the bins back in. You need to put them in from the opposite they they came out, so they move in the direction that the arrow pointed. Don’t try and reverse them in as such.
You can do this on the bracelet block again, which will make it a lot easier.
The pins will still be hard to push in and using the block makes sure that the two links stay in place while you push the pin through both of them.
I used a little watch hammer to push them in, but I did not hammer them. The pins are way too tight for that. You are better to hold the hammer against the pin and then push the top of the hammer down.
You could push the pin directly, but as it’s very small, it will just dig into your hand; really you need something larger to be in between so it can spread the force into your hand. You could really use anything that is hard, that will allow you to push down on the pins.
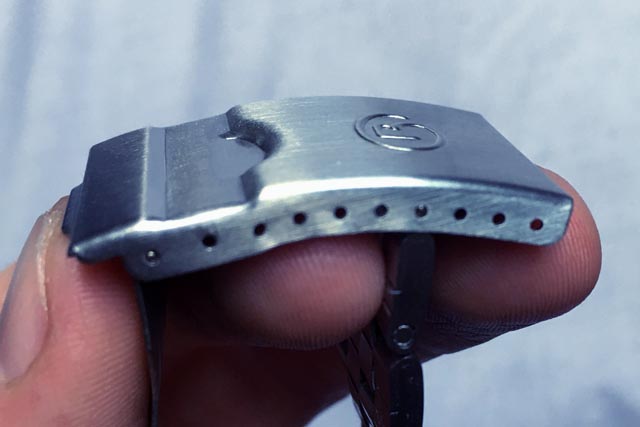
Micro Adjust
Hopefully now it’s reassembled it is a good fit, but if it’s not then you can use the micro adjust to hone things in and get the perfect fit.
There are 8 holes of micro adjust, which is a lot compared to some watches, so you should really be able to get the perfect fit.
If you put the watch on after resizing it and it’s too tight, then you need to add another link back in. The micro adjust will only make the watch smaller.
If your watch is a little loose, but you think removing a link might be too much, then change the micro adjust to get the perfect fit.
You just need to poke the pin in with a spring bar tool and push it across and it should pop into the next hole.
Using the micro adjust is better than removing another link, as it is easier to do, but more importantly, if you wrist swells, you can easily readjust it again back to the original size.
Readjust
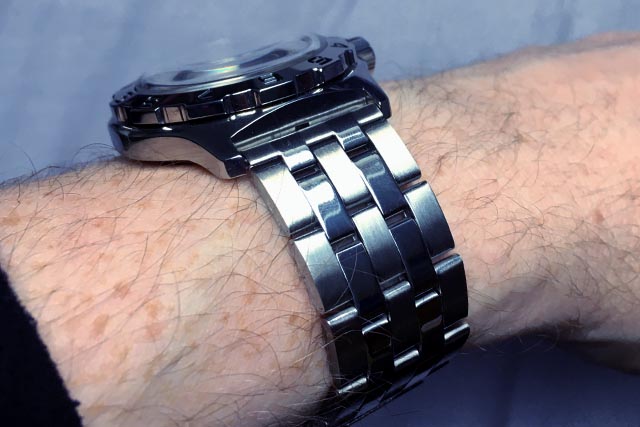
Hopefully you have nailed it and got the right size, but you need to wear the watch to find out.
Wear the watch for a while and see how it wears. You wrist may swell or shrink over the day, so you need to see if you have the size right to accommodate for this. You should take it off every few hours and see if it’s too tight and cutting in to your skin, or shake your wrist around and see if it’s too loose and sliding up and down your wrist.
If it’s not right, just readjust it. This does means repeating the same steps as before. I would first try with the micro adjust and if this isn’t solving the issue, then you will need to remove or add more links.
Get The Balance Right
I have sort of touched on this already, but you need to get the balance right. This usually means removing an equal number of links from both sides of the clasp, but it doesn’t always work like that.
Basically you want the clasp to be in the middle of your wrist and of course on watch head should be sat in a good position on the top of your wrist. You may need to play around with what links you remove to get this balance right.
When I initially adjusted my bracelet I had to remove 3 links, 2 from one side of the clasp and 1 from the other. When I put the watch back together, it fit well, but it didn’t seem right, there was something off balance.
I played around with the micro adjust and it still wasn’t right. So I had to play around with the distribution of the links.
The side I had removed 1 from, I went back and removed another, so there was now 2 removed from that side. For the other side, I did the opposite. I had removed 2, but I changed it to 1.
So, I still ended up with 3 links removed, but now they where the other way round, if that makes sense. This seems like it really shouldn’t matter, or do anything, but you will be surprised how much it can change.
Due to the shape of the clasp and the position of where the watch head sat, changing the lengths of the either side bracelet totally changed how the watch sat on my wrist. The clap was now in the centre of my wrist and the watch now sat where it was most comfortable.
This was of course annoying as I had to take everything a part and re-do it all, but now the watch wears perfectly.
If your watch seems like the right size, but also isn’t right, check the balance a little change like the one I made can make a world of difference.
Conclusion
This guide is a little long winded, but hopefully everything you need to know is well covered. If you still have questions, let me know.
Adjusting the strap isn’t too difficult. It can seem really hard at first, especially when the pins do not move, but when you get the first one moving and realise how much pressure you need to apply, you will see that it’s a simple job and you will have the perfect fitting Vostok in no time.
(You can read more about – Why Do People Love Vostok Watches?)

Ian is the main writer at Horology Dream and is a lover all things watch related.
He has been a watch collector for over a decade and brings his knowledge and experience to this site to help you on your own watch collecting journey.
You can connect with him on Social media and talk anything watches or read more about him on his Author Page.